Broccoli and Cauliflower sprouts
"OMG, I have broccoli!!" is what I texted my husband on Thursday, four days after planting the seeds. Cauliflower, beans and peas followed, then cucumber. But what about tomatoes?! Tomatoes are why we are inspired to garden, many a gardener has sprouted through sheer exasperation at mealy, tasteless pink orbs offered in our grocery stores. Or worse, artificially shiny, red, and equally tasteless, Roma's that are the cheapest offer in winter and for good reason! Someone told me that tomatoes are notoriously hard to grow from seed. Now she tells me!
Finally, a tomato germinated seven days later. Others followed as if testing the environment, encouraged by the 'idiot' test; the happy seed to find herself in a moist, warm bed with sun teasing her in the morning. Now for the painful task of elimination: snipping the second seed. I followed the advice of seed growers everywhere and planted two seeds, in the event that one was a dud. I felt like the worst executioner for aborting that second life in favor of his stronger brother. Next year, we'll go with one seed and depend on the garden center to make up for the duds.
English Peas and Sugar Snap Peas
Ok, so on for the preparation preparations. This Sunday's task was to fill the gardens with growing goodness. According to the Sq. Ft. gardening textbook, there was a particular mix for the growing material that was high in peat. I did not find that this was especially successful in Texas, so I am going with a different strategy. I had the prescribed mix in my first three gardens, which I divided between all seven. Then I added a mixture of organic compost and topsoil with some organic compost: 2:1 respectively (Living Earth). I turned it all in together and filled each bed to the top.
Once all the beds were full and mixed, I needed to prepare for a late frost. The Sq. Ft. garden textbook suggests using two 10 ft. 1/2 inch PVC pipe to make a dome: you put one end in a corner of the garden, then the other end in the opposite corner, repeat with the second pipe, and connect at the cross with a zip-tie. I decided that this was too tall of a dome, so I cut the pipes down by a couple of feet. I spray painted them green so they would not be so noticeable. I also made two other trellises (I already had two) out of PVC pipe and bird netting for the beans to grow on. These are slipped over 4' re-bar that has been hammered into the ground on each side of a garden about a foot down. That way they are fairly wind/storm proof, but sometimes you need to replace the netting after a bad storm.
Each garden is designed to have tall/climbing plants in the back and then graduating plants toward the front. So, the 4 back gardens have beans in the back followed by lower growing plants. The three front gardens all have tomatoes in the back with lower plants in front. I'll discuss tomato supports when I figure that out!
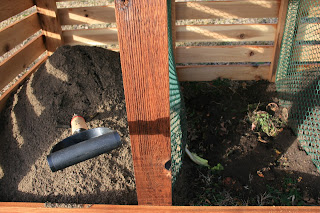
Now for the first composting! As I said before, I will be composting pulp from by Breville from juicing and from running fresh veggie scraps through the juicer. The first step is to sprinkle the pulp evenly over the bottom of the compost bin.
Second steps are to sprinkle manure first, then dirt second.
And that's it! I'll do that everyday until it is full, I will probably try to turn it once a week since it looks like it will fill up fairly quickly. Once I get a decent pile, I plan on getting some red wiggler worms that a buddie recommended to me, since they love veggie pulp.
So, that was today's work, I also planted some bulbs a friend gave me, in the front yard. I did test a tarp over the dome I had made for frost, but it needs perfection. I had someone ask me about warding off pests from the compost bin, like rodents. I had not read much about pests bothering the compost bin in my book, and I don't anticipate many since I am only using pulp, but I'll certainly let you know if I have a problem!
The Bluebonnets are one their way! I'm so excited about gardening this year! And it was evening and morning, the second day!


No comments:
Post a Comment