Tuesday, January 31, 2012

First Challenges

Bean and pea sprouts going strong.

Several problems have confronted me this week. First, with all the Sq Fts filled with new dirt, it has become irresistible to the two neighboring cats, Oliver and Bob, to ignore the soft digs. Google informed me of several ways to deter them, from cayenne pepper to $50 sonic zappers, also guaranteed to manage a variety of critters. While I am not a fan of outdoor kitties (mostly a nuisance that just pees, craps, digs, and gets stuck under the hood of your truck), I still don't want to harm them. And besides, if it wasn't the neighbors' cat, it would be feral cats. So, I went with a Repels All that included blood meal, garlic oil, and something else, but no cayenne. I sprinkled this all around the gardens and then took my little terrier/gremlin/thing, Maizy, out to test the potency. She marched right out to the gardens and then froze as soon as she got at whiff. Then she crouched down and sniffed everywhere like she expected to find evidence of the Squirrel Massacre. We'll see what the cats think.

Second problem. Of all the seeds, none of the pepper seeds sprouted. Everything else had a showing, even the celery, which looked liked a green hair with split-ends. I have been taking the seedlings outside for sunning each day, but two of the cucumber sprouts  have been broken by the breeze. I was also surprised to see that even though the broccoli, cauliflower, and cabbage were the first to emerge, they have been the slowest to develop. Fragile, week things they seem to be next to the beans and peas. The tomatoes are no different; just tiny slips of two leaves and some timidly sprouting third leaves. But no peppers. I used seeds from past peppers and new seeds, but nothing. Google again informed me that maybe peppers prefer higher temperatures and drier conditions. So, I started again with a new tray for peppers only and let the AGA do the babysitting.


83 degrees

Third problem. Protecting the plants from frost. My final solution was to purchase construction grade plastic and some $1 clamps (that will rust horribly! but the plastic versions were three times the price). I planted seeds for greens, lettuces, carrots, radishes, potatoes, Swish chard, and onion sets. As I said in my last blog, I set up an example for a greenhouse type tarp. I repeated this idea for the next four gardens. We are having unseasonable warm weather for January, so during these 70 degree days, I have to open them up due to greenhouse temperatures in the 90s.


So, if the nervous neighbors haven't complained about my compost bin, this should put them over the edge. But the tarps are only temporary for the next few weeks. As you can see, I have the hose drug out from the back patio to do watering, but we are working on a better solution and I'll let you know about that when it is completed.

Composting is going as planned! I have been adding layers almost every day and there is no odour at all. There are also plenty of insects interested in my pile, which is a good thing due to their decomposing efforts.

My last thought is that I bought a book, Seed to Seed, and has been a wonderful inspiration for learning how to garden and save seeds for the next year. With our new genetic methods of farming, it is possible to create varieties that are disease and pest resistant and also with seeds that are worthless for saving. I will be purchasing my seeds next year from Seed Savers Exchange next year.

You are not the only ones interested in my exploits. I have a friendly neighbor or two that are keeping up with my activities!


Sunday, January 22, 2012

Getting Prepared Day 2

Broccoli and Cauliflower sprouts

"OMG, I have broccoli!!" is what I texted my husband on Thursday, four days after planting the seeds. Cauliflower, beans and peas followed, then cucumber. But what about tomatoes?! Tomatoes are why we are inspired to garden, many a gardener has sprouted through sheer exasperation at mealy, tasteless pink orbs offered in our grocery stores. Or worse, artificially shiny, red, and equally tasteless, Roma's that are the cheapest offer in winter and for good reason! Someone told me that tomatoes are notoriously hard to grow from seed. Now she tells me!

Finally, a tomato germinated seven days later. Others followed as if testing the environment, encouraged by the 'idiot' test; the happy seed to find herself in a moist, warm bed with sun teasing her in the morning. Now for the painful task of elimination: snipping the second seed. I followed the advice of seed growers everywhere and planted two seeds, in the event that one was a dud. I felt like the worst executioner for aborting that second life in favor of his stronger brother. Next year, we'll go with one seed and depend on the garden center to make up for the duds.

 
English Peas and Sugar Snap Peas

Ok, so on for the preparation preparations. This Sunday's task was to fill the gardens with growing goodness. According to the Sq. Ft. gardening textbook, there was a particular mix for the growing material that was high in peat. I did not find that this was especially successful in Texas, so I am going with a different strategy. I had the prescribed mix in my first three gardens, which I divided between all seven. Then I added a mixture of organic compost and topsoil with some organic compost: 2:1 respectively (Living Earth). I turned it all in together and filled each bed to the top.


Once all the beds were full and mixed, I needed to prepare for a late frost. The Sq. Ft. garden textbook suggests using two 10 ft. 1/2 inch PVC pipe to make a dome: you put one end in a corner of the garden, then the other end in the opposite corner, repeat with the second pipe, and connect at the cross with a zip-tie. I decided that this was too tall of a dome, so I cut the pipes down by a couple of feet. I spray painted them green so they would not be so noticeable. I also made two other trellises (I already had two) out of PVC pipe and bird netting for the beans to grow on. These are slipped over 4' re-bar that has been hammered into the ground on each side of a garden about a foot down. That way they are fairly wind/storm proof, but sometimes you need to replace the netting after a bad storm.


Each garden is designed to have tall/climbing plants in the back and then graduating plants toward the front. So, the 4 back gardens have beans in the back followed by lower growing  plants. The three front gardens all have tomatoes in the back with lower plants in front. I'll discuss tomato supports when I figure that out!

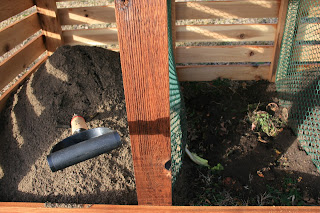
Now for the first composting! As I said before, I will be composting pulp from by Breville from juicing and from running fresh veggie scraps through the juicer. The first step is to sprinkle the pulp evenly over the bottom of the compost bin.


Second steps are to sprinkle manure first, then dirt second.


And that's it! I'll do that everyday until it is full, I will probably try to turn it once a week since it looks like it will fill up fairly quickly. Once  I get a decent pile, I plan on getting some red wiggler worms that a buddie recommended to me, since they love veggie pulp.

So, that was today's work, I also planted some bulbs a friend gave me, in the front yard. I did test a tarp over the dome I had made for frost, but it needs perfection.  I had someone ask me about warding off pests from the compost bin, like rodents. I had not read much about pests bothering the compost bin in my book, and I don't anticipate many since I am only using pulp, but I'll certainly let you know if I have a problem!

The Bluebonnets are one their way! I'm so excited about gardening this year! And it was evening and morning, the second day!


Sunday, January 15, 2012

Getting Prepared!

Getting Ready for Dirt.

Man, we had a georgeous weekend here in North Texas! Unfortunately, I had to work all day on Saturday, but we made up for it on Sunday. My goals for the weekend were to get the four new Squ Fts built, finish the compost bin, and start some seedlings. Check, check, and check!

I designed a compost bin that was inspired by Renoir's three-compartment composter. For my composter, I wanted a slow composter that would provide complete material once a year in January to add to my Squ Fts. I have a bad back and regular turning of the compost pile sounds like a bad idea. The front is open and faces the side of our house. I thought that would make it easy to layer the compost pile and also allow air to flow freely. So here's the scoop: 3x8x3 with four 2' compartments. The first three are seperated by chicken netting and the fourth is seperated by cedar slats. The first three are for the composting: one for dirt, one for compost, and one for manure. I have been juicing again this year and I am also running all my vegetable kitchen scraps through the Breville, which leaves a nice vegetable pulp all ready for composting. I'll sprinkle the veggie pulp in the compost bin, sprinkle some manure, the top off with dirt and a spritz of water. I think I'll also ask my lawn service to leave me some grass clippings once in a while as well. That's the plan with that, we'll see how that works. My non-gardening friends said it sounds revolting and smelly and I replied that according to the texbook literature, if it is smelly, I'm doing something wrong. The last bin is for gardening tools and what-knot to keep things handy near the Squ Fts.


I did have some anxiety about what my neighbors might think about the compost bin, I mean - an 8 ft. box in the yard might be frowned upon. Sure enough, the only neighbor I really thought would complain (the bin is next to his fence) happened to come outside right at the moment that Greg and I were hauling it out to its resting place. No complaints ...... yet.


The Squ Fts were a breeze to make! Mine are comprised of 4x4 1/2" plywood, 4 boards of 1x6x16 pressure treated deck planks cut to 47", and black tarp plastic. I cover the plywood with plastic and stapled to the back. Then I screw the boards into a square frame with a consecutive overlapping pattern (one end overlaps the next, then repeat clockwise). Finally, I screw the bottom onto the frame with the exposed plywood facing up. Last thing is to take a razor blade and make several slits in the plastic, then with a large drill bit, drill holes in the plywood to allow for drainage. Below are two old Squ Fts with left over collards and arugula and two new Squ Fts behind ready for dirt.


The first three are about three years old. The dirt mixture prescribed by the book did not work for me at first because of the large amount of peat. I noticed that water just sat on top and did not penetrate down to the roots. My mother told me that was because I did not saturate the peat before adding it to the beds. I plan on dividing up the existing dirt between all seven beds, so each one has some peat, then add dirt/compost/manure for the rest.

And for my next trick! I charted out what will go in each square foot of the Squ Fts for the spring garden and then charted out seedlings for the four black plant trays I borrowed from Calloways. Oh, the agony! trying to decide how many tomatoes vs. peppers, will we really eat bok choy? are two green bean bushes enough? I finally got things charted out and seeds planted. I followed the recommended two-seed-per-plant and I used a seedling potting mix that had quite alot of peat, so I doused it with water and mixed it in before filling the trays. I had read about some seedling hotpads, and other contraptions, but I figured if those seeds need so much help to germinate, they will never make it through a Texas summer. Even then, I know it is irrational, but I have already checked them twice tonite.


Greg had his own projects today. He trimmed back the cattails by the pond, chopped some firewood, and various other outdoor chores. The last thing I did was to prepare a couple of trellis nettings left over from last year, but I will need several others. I sure hope we don't get another wicked hail storm like we did last summer ..... but I guess a real farmer would say "Welcome to my world."